Unreal Engine 5 instruction: Difference between revisions
No edit summary |
Marked this version for translation |
||
| Line 2: | Line 2: | ||
<translate> | <translate> | ||
<!--T:1--> | |||
== Unreal Engine 5 - Interface == | == Unreal Engine 5 - Interface == | ||
The interface in UE5 is relatively simple and easy to understand, but for those who have worked with other engines before, it may seem unfamiliar and confusing. Let's talk about the most basic options that can be useful during work. In the image below, we can see the entire interface, and we'll use it to explain the location of elements and their purposes. | The interface in UE5 is relatively simple and easy to understand, but for those who have worked with other engines before, it may seem unfamiliar and confusing. Let's talk about the most basic options that can be useful during work. In the image below, we can see the entire interface, and we'll use it to explain the location of elements and their purposes. | ||
[[File:Ue5-1.png|center|700x700px]] | [[File:Ue5-1.png|center|700x700px]] | ||
<!--T:2--> | |||
== Upside panel == | == Upside panel == | ||
Let's start with the most important - the top panel. | Let's start with the most important - the top panel. | ||
<!--T:3--> | |||
The top panel has many different buttons and icons, but for our needs, we are interested in four main tabs: File, Edit, Window, and Tools. The other tabs are not necessary for you. Let's take a closer look at each of these tabs: | The top panel has many different buttons and icons, but for our needs, we are interested in four main tabs: File, Edit, Window, and Tools. The other tabs are not necessary for you. Let's take a closer look at each of these tabs: | ||
[[File:Ue5-2.png|border|center|930x930px]] | [[File:Ue5-2.png|border|center|930x930px]] | ||
<!--T:4--> | |||
=== Files === | === Files === | ||
We are only interested in 3 options here: | We are only interested in 3 options here: | ||
<!--T:5--> | |||
* New Level: creates a new level. | * New Level: creates a new level. | ||
* Open Level: opens an existing level. | * Open Level: opens an existing level. | ||
* Save All: saves everything, a very important option as the hotkey may not always work. | * Save All: saves everything, a very important option as the hotkey may not always work. | ||
<!--T:6--> | |||
[[File:Ue5-3.png|center]] | [[File:Ue5-3.png|center]] | ||
<!--T:7--> | |||
=== Edit === | === Edit === | ||
You may need only 2 options here: Editor Preferences and Project Settings. It is not advisable to make changes in these options without specific instructions on what to do or not to do. Your immediate supervisor or technical lead can provide such instructions. And forget about the Plugins option while working on this project, any plugins are prohibited for a number of reasons unless they are our own production. | You may need only 2 options here: Editor Preferences and Project Settings. It is not advisable to make changes in these options without specific instructions on what to do or not to do. Your immediate supervisor or technical lead can provide such instructions. And forget about the Plugins option while working on this project, any plugins are prohibited for a number of reasons unless they are our own production. | ||
[[File:Ue5-4.png|center]] | [[File:Ue5-4.png|center]] | ||
<!--T:8--> | |||
=== Window === | === Window === | ||
Here you can enable or disable auxiliary windows hidden on the first screenshot to the right. Useful options are highlighted with red arrows. | Here you can enable or disable auxiliary windows hidden on the first screenshot to the right. Useful options are highlighted with red arrows. | ||
[[File:Ue5-5.png|center]] | [[File:Ue5-5.png|center]] | ||
<!--T:9--> | |||
=== Tools === | === Tools === | ||
There are many different tools here, and describing all of them can take a lot of time. However, to save your time, we want to mention the most useful option - Statistics. To quickly find it, follow these steps: | There are many different tools here, and describing all of them can take a lot of time. However, to save your time, we want to mention the most useful option - Statistics. To quickly find it, follow these steps: | ||
<!--T:10--> | |||
* Hover over the Tools tab in the top panel. | * Hover over the Tools tab in the top panel. | ||
* Start typing "Stat" in the search field that will automatically open after hovering over the Tools tab. | * Start typing "Stat" in the search field that will automatically open after hovering over the Tools tab. | ||
* As you start typing "Stat," the Statistics option will appear. | * As you start typing "Stat," the Statistics option will appear. | ||
<!--T:11--> | |||
[[File:Ue5-6.png|center]] | [[File:Ue5-6.png|center]] | ||
<!--T:12--> | |||
==== Statistics ==== | ==== Statistics ==== | ||
This tool allows you to monitor the amount of memory used for selected objects or all objects in the level. It is an essential tool for debugging and optimizing the level, but it is also useful for 3D modelers. You can easily select one or multiple objects whose information you want to see. | This tool allows you to monitor the amount of memory used for selected objects or all objects in the level. It is an essential tool for debugging and optimizing the level, but it is also useful for 3D modelers. You can easily select one or multiple objects whose information you want to see. | ||
<!--T:13--> | |||
In the right part of the window, there is a filter that allows you to choose what information you want to focus on - selected objects or the entire level. As a 3D modeler, you will probably be interested in the specific object option - "Selected Objects." | In the right part of the window, there is a filter that allows you to choose what information you want to focus on - selected objects or the entire level. As a 3D modeler, you will probably be interested in the specific object option - "Selected Objects." | ||
[[File:Ue5-7.png|center|934x934px]] | [[File:Ue5-7.png|center|934x934px]] | ||
| Line 47: | Line 60: | ||
[[File:Ue5-9.png|center|700x700px]] | [[File:Ue5-9.png|center|700x700px]] | ||
<!--T:14--> | |||
== Upside panel 2 == | == Upside panel 2 == | ||
Now let's look at the important elements below: "Selection Mode," "Quick Add," "Play," and "Stop." | Now let's look at the important elements below: "Selection Mode," "Quick Add," "Play," and "Stop." | ||
<!--T:15--> | |||
"Play" and "Stop" are straightforward: the first button starts the game simulation, and the second one stops it (you can also stop the simulation using the "Esc" key). | "Play" and "Stop" are straightforward: the first button starts the game simulation, and the second one stops it (you can also stop the simulation using the "Esc" key). | ||
<!--T:16--> | |||
However, "Selection Mode" and "Quick Add" require more detailed explanation. | However, "Selection Mode" and "Quick Add" require more detailed explanation. | ||
[[File:Ue5-10.png|center|950x950px]] | [[File:Ue5-10.png|center|950x950px]] | ||
<!--T:17--> | |||
=== Selection Mode === | === Selection Mode === | ||
Among all the listed options, we are actually interested in only the first five: "Selection," "Landscape," "Foliage," "Mesh Paint," and "Modeling." | Among all the listed options, we are actually interested in only the first five: "Selection," "Landscape," "Foliage," "Mesh Paint," and "Modeling." | ||
<!--T:18--> | |||
# "Selection": This mode is for selecting objects in the scene. You can highlight objects, drag, scale, or delete them. It's the standard mode. | # "Selection": This mode is for selecting objects in the scene. You can highlight objects, drag, scale, or delete them. It's the standard mode. | ||
# "Landscape": This mode allows you to create and edit the landscape in your level. You can make mountains, hills, valleys, and other terrain shapes to give your game or scene a natural and realistic look. | # "Landscape": This mode allows you to create and edit the landscape in your level. You can make mountains, hills, valleys, and other terrain shapes to give your game or scene a natural and realistic look. | ||
| Line 64: | Line 82: | ||
# "Modeling": This mode provides tools for creating and editing 3D models directly in the engine. You can make complex shapes and details for your objects or characters. | # "Modeling": This mode provides tools for creating and editing 3D models directly in the engine. You can make complex shapes and details for your objects or characters. | ||
<!--T:19--> | |||
[[File:Ue5-11.png|center]] | [[File:Ue5-11.png|center]] | ||
<!--T:20--> | |||
=== Quick Add === | === Quick Add === | ||
This is the icon of a cube with a plus sign, known as "Add Actor" or "Add Component." It provides a wide range of useful functions, including quick creation of primitive objects like cubes, spheres, and other shapes. | This is the icon of a cube with a plus sign, known as "Add Actor" or "Add Component." It provides a wide range of useful functions, including quick creation of primitive objects like cubes, spheres, and other shapes. | ||
<!--T:21--> | |||
Additionally, through this icon, you can add various light sources, cameras, sound effects, and other components that enrich your level or scene. It also allows you to adjust post-processing components to achieve desired real-time visual effects. | Additionally, through this icon, you can add various light sources, cameras, sound effects, and other components that enrich your level or scene. It also allows you to adjust post-processing components to achieve desired real-time visual effects. | ||
[[File:Ue5-12.png|center|957x957px]] | [[File:Ue5-12.png|center|957x957px]] | ||
Among the useful elements, the following tools will be particularly important for creating levels: | Among the useful elements, the following tools will be particularly important for creating levels: | ||
<!--T:22--> | |||
* Sky Light: Used to simulate various natural lighting, such as daylight or moonlight. | * Sky Light: Used to simulate various natural lighting, such as daylight or moonlight. | ||
<!--T:23--> | |||
* Sky Atmosphere: Allows you to create realistic atmospheric effects, including a blue sky, clouds, and transitions between day and night. | * Sky Atmosphere: Allows you to create realistic atmospheric effects, including a blue sky, clouds, and transitions between day and night. | ||
<!--T:24--> | |||
* PostProcessVolume: Allows you to adjust post-processing effects on the scene, including color correction, toning, blur, and other visual effects. | * PostProcessVolume: Allows you to adjust post-processing effects on the scene, including color correction, toning, blur, and other visual effects. | ||
<!--T:25--> | |||
* Exponential Height Fog: Creates an atmospheric fog effect that adds depth to your level. | * Exponential Height Fog: Creates an atmospheric fog effect that adds depth to your level. | ||
<!--T:26--> | |||
* Volumetric Clouds: Provides tools for creating realistic volumetric clouds that add atmosphere to your scene. | * Volumetric Clouds: Provides tools for creating realistic volumetric clouds that add atmosphere to your scene. | ||
<!--T:27--> | |||
* Directional Light: An important light source that simulates sunlight. It allows you to control the lighting in the scene and create dynamic shadows. | * Directional Light: An important light source that simulates sunlight. It allows you to control the lighting in the scene and create dynamic shadows. | ||
<!--T:28--> | |||
[[File:Ue5-13.png|center|811x811px]] | [[File:Ue5-13.png|center|811x811px]] | ||
<!--T:29--> | |||
== Upside panel - Settings == | == Upside panel - Settings == | ||
At the top of the screen, there is another very useful option - Settings. | At the top of the screen, there is another very useful option - Settings. | ||
| Line 92: | Line 121: | ||
When you choose this option, you'll see a small menu with various possibilities, but we are only interested in two of them - "Engine Scalability Settings" and "Material Quality Level." | When you choose this option, you'll see a small menu with various possibilities, but we are only interested in two of them - "Engine Scalability Settings" and "Material Quality Level." | ||
<!--T:30--> | |||
In "Engine Scalability Settings," you can reduce the resolution of textures, shadows, and other graphic settings to make the work more comfortable if you have a less powerful PC. | In "Engine Scalability Settings," you can reduce the resolution of textures, shadows, and other graphic settings to make the work more comfortable if you have a less powerful PC. | ||
<!--T:31--> | |||
The second option, "Material Quality Level," allows you to apply lower shader levels to materials. | The second option, "Material Quality Level," allows you to apply lower shader levels to materials. | ||
[[File:Ue5-15.png|center|593x593px]] | [[File:Ue5-15.png|center|593x593px]] | ||
<!--T:32--> | |||
== Viewport == | == Viewport == | ||
The viewport is not overloaded with various settings and icons; only its top part contains some elements. To avoid confusion, let's start exploring the interface from left to right. | The viewport is not overloaded with various settings and icons; only its top part contains some elements. To avoid confusion, let's start exploring the interface from left to right. | ||
| Line 102: | Line 134: | ||
By clicking on the first option, a window with additional information will pop up. Two useful functions you might need are: | By clicking on the first option, a window with additional information will pop up. Two useful functions you might need are: | ||
<!--T:33--> | |||
* Show FPS: displays your Frames Per Second (the number of frames per second) on the right side of the screen. | * Show FPS: displays your Frames Per Second (the number of frames per second) on the right side of the screen. | ||
* Disable Realtime Override: turns off all real-time special effects. | * Disable Realtime Override: turns off all real-time special effects. | ||
<!--T:34--> | |||
[[File:Ue5-17.png|center]] | [[File:Ue5-17.png|center]] | ||
The next button allows you to choose the view in which you want to see the world. Sometimes it's useful to look at the level from above or from the side. | The next button allows you to choose the view in which you want to see the world. Sometimes it's useful to look at the level from above or from the side. | ||
| Line 110: | Line 144: | ||
The next button is the most important of all; here you can change the display mode. | The next button is the most important of all; here you can change the display mode. | ||
<!--T:35--> | |||
* Lit: shows objects with their shaders, including all shadows. | * Lit: shows objects with their shaders, including all shadows. | ||
* Unlit: removes lighting and shadows, displaying objects without lighting effects. | * Unlit: removes lighting and shadows, displaying objects without lighting effects. | ||
| Line 117: | Line 152: | ||
* Level of Detail Coloration => Mesh LOD Coloration: shows how the Level of Detail (LOD) works for objects at the current moment. | * Level of Detail Coloration => Mesh LOD Coloration: shows how the Level of Detail (LOD) works for objects at the current moment. | ||
<!--T:36--> | |||
[[File:Ue5-19.png|center]] | [[File:Ue5-19.png|center]] | ||
[[File:Ue5-20.png|center|700x700px]] | [[File:Ue5-20.png|center|700x700px]] | ||
| Line 123: | Line 159: | ||
On the right side, there is a bit more functionality. | On the right side, there is a bit more functionality. | ||
<!--T:37--> | |||
# Object Selection: In this mode, you won't accidentally move the object. | # Object Selection: In this mode, you won't accidentally move the object. | ||
# Object Translation along the XYZ axes. | # Object Translation along the XYZ axes. | ||
| Line 137: | Line 174: | ||
# Camera movement speed. | # Camera movement speed. | ||
<!--T:38--> | |||
[[File:Ue5-22.png|center]] | [[File:Ue5-22.png|center]] | ||
=== Camera Control === | === Camera Control === <!--T:39--> | ||
<!--T:40--> | |||
* To move around in the space, you need to hold the right mouse button and use the keys WASD. You can also use Q to move up and E to move down. | * To move around in the space, you need to hold the right mouse button and use the keys WASD. You can also use Q to move up and E to move down. | ||
* While moving, you can rotate the mouse wheel to speed up or slow down the camera movement. | * While moving, you can rotate the mouse wheel to speed up or slow down the camera movement. | ||
| Line 151: | Line 190: | ||
* Holding the right mouse button and pressing C zooms in, and pressing Z zooms out. To return to the original zoom level, release the right mouse button. | * Holding the right mouse button and pressing C zooms in, and pressing Z zooms out. To return to the original zoom level, release the right mouse button. | ||
<!--T:41--> | |||
* R.CTRL+L Move the sun in scene | * R.CTRL+L Move the sun in scene | ||
<!--T:42--> | |||
=== Right Menu === | === Right Menu === | ||
In the right part of the screen, there are tabs: Details, Outliner, and others. You are interested in the first two. | In the right part of the screen, there are tabs: Details, Outliner, and others. You are interested in the first two. | ||
<!--T:43--> | |||
==== Details ==== | ==== Details ==== | ||
'''Details''' - displays information about the selected object along with all its settings. You can quickly access the mesh by clicking on "Static Mesh." If you need to go into the materials of the selected object, you can do it by clicking on "Materials." | '''Details''' - displays information about the selected object along with all its settings. You can quickly access the mesh by clicking on "Static Mesh." If you need to go into the materials of the selected object, you can do it by clicking on "Materials." | ||
<!--T:44--> | |||
To navigate to the location of these files in the explorer, click on the folder with a magnifying glass next to them. | To navigate to the location of these files in the explorer, click on the folder with a magnifying glass next to them. | ||
[[File:Ue5-23.png|center|493x493px]] | [[File:Ue5-23.png|center|493x493px]] | ||
<!--T:45--> | |||
==== Outliner ==== | ==== Outliner ==== | ||
'''Outliner -''' in this menu, you can see all the objects located on the level. | '''Outliner -''' in this menu, you can see all the objects located on the level. | ||
[[File:Ue5-24.png|center|432x432px]] | [[File:Ue5-24.png|center|432x432px]] | ||
<!--T:46--> | |||
== Content Drawer == | == Content Drawer == | ||
At the bottom of the screen, you will find the Content Drawer tab, which you will be using most of the time. You can open it either by clicking on its name or by using the hotkey CTRL+SPACE. | At the bottom of the screen, you will find the Content Drawer tab, which you will be using most of the time. You can open it either by clicking on its name or by using the hotkey CTRL+SPACE. | ||
| Line 183: | Line 228: | ||
After doing this operation, a new window will open with information about how much space the selected folder and all the files that use files from this folder occupy. For example, the folder may contain an instance material that uses a master material from another folder, which, in turn, uses textures from a third folder. This option will gather all the files used in this folder, even if some of them use information from other folders. | After doing this operation, a new window will open with information about how much space the selected folder and all the files that use files from this folder occupy. For example, the folder may contain an instance material that uses a master material from another folder, which, in turn, uses textures from a third folder. This option will gather all the files used in this folder, even if some of them use information from other folders. | ||
<!--T:47--> | |||
On the right side of this window, you can see filters: "Disk Size" and "Memory Size." "Disk Size" shows how much space these files take on your HDD/SSD, and "Memory Size" shows the amount of used RAM (Random Access Memory). | On the right side of this window, you can see filters: "Disk Size" and "Memory Size." "Disk Size" shows how much space these files take on your HDD/SSD, and "Memory Size" shows the amount of used RAM (Random Access Memory). | ||
[[File:Ue5-33.png|center|700x700px]] | [[File:Ue5-33.png|center|700x700px]] | ||
Latest revision as of 04:31, 7 November 2024
Unreal Engine 5 - Interface
The interface in UE5 is relatively simple and easy to understand, but for those who have worked with other engines before, it may seem unfamiliar and confusing. Let's talk about the most basic options that can be useful during work. In the image below, we can see the entire interface, and we'll use it to explain the location of elements and their purposes.
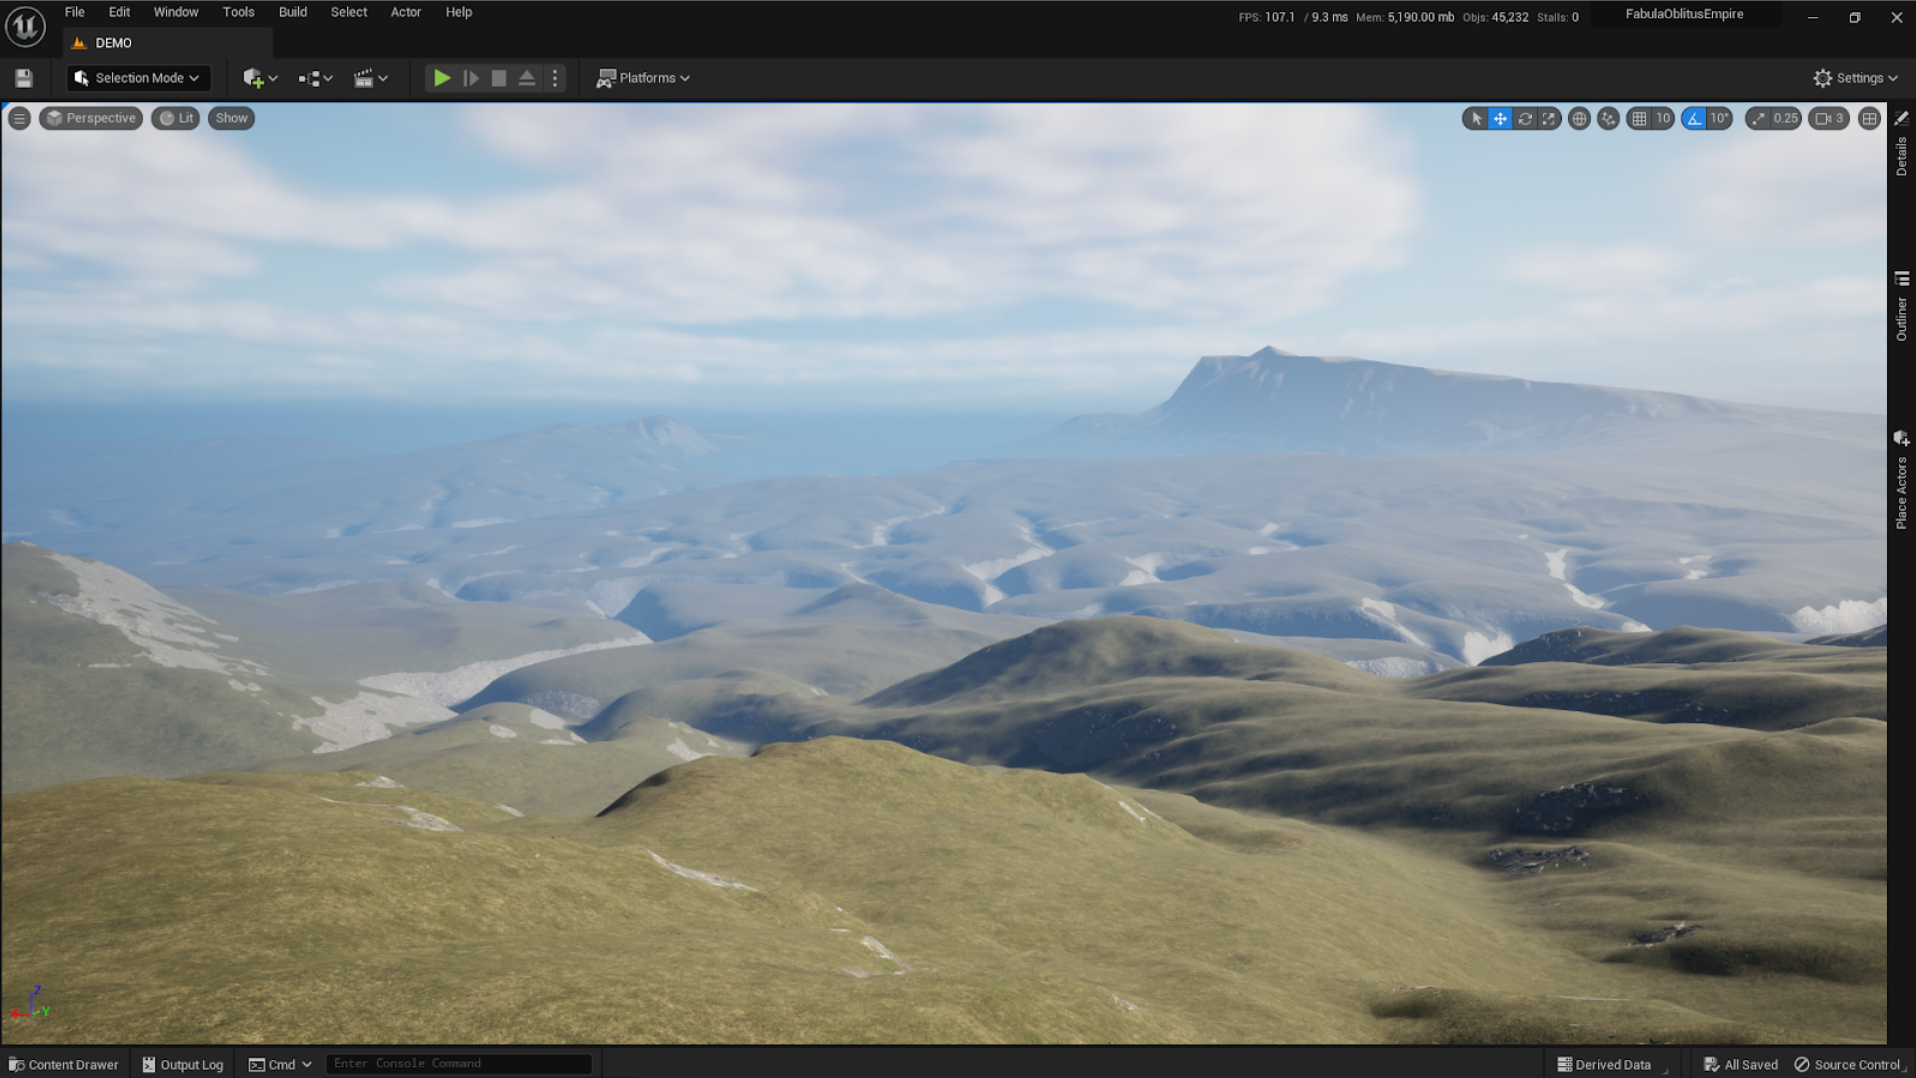
Upside panel
Let's start with the most important - the top panel.
The top panel has many different buttons and icons, but for our needs, we are interested in four main tabs: File, Edit, Window, and Tools. The other tabs are not necessary for you. Let's take a closer look at each of these tabs:

Files
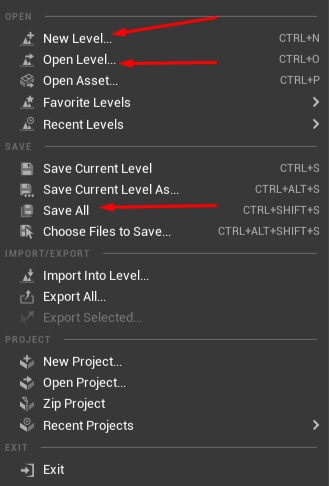
We are only interested in 3 options here:
- New Level: creates a new level.
- Open Level: opens an existing level.
- Save All: saves everything, a very important option as the hotkey may not always work.
Edit
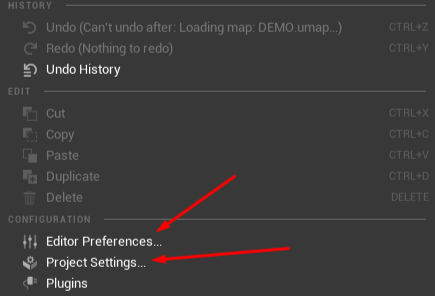
You may need only 2 options here: Editor Preferences and Project Settings. It is not advisable to make changes in these options without specific instructions on what to do or not to do. Your immediate supervisor or technical lead can provide such instructions. And forget about the Plugins option while working on this project, any plugins are prohibited for a number of reasons unless they are our own production.
Window
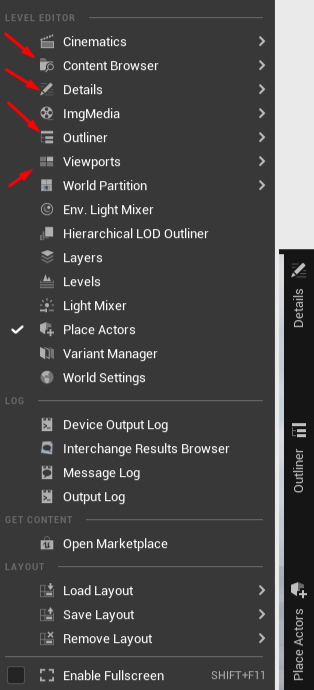
Here you can enable or disable auxiliary windows hidden on the first screenshot to the right. Useful options are highlighted with red arrows.
Tools
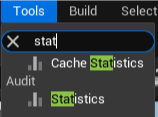
There are many different tools here, and describing all of them can take a lot of time. However, to save your time, we want to mention the most useful option - Statistics. To quickly find it, follow these steps:
- Hover over the Tools tab in the top panel.
- Start typing "Stat" in the search field that will automatically open after hovering over the Tools tab.
- As you start typing "Stat," the Statistics option will appear.
Statistics
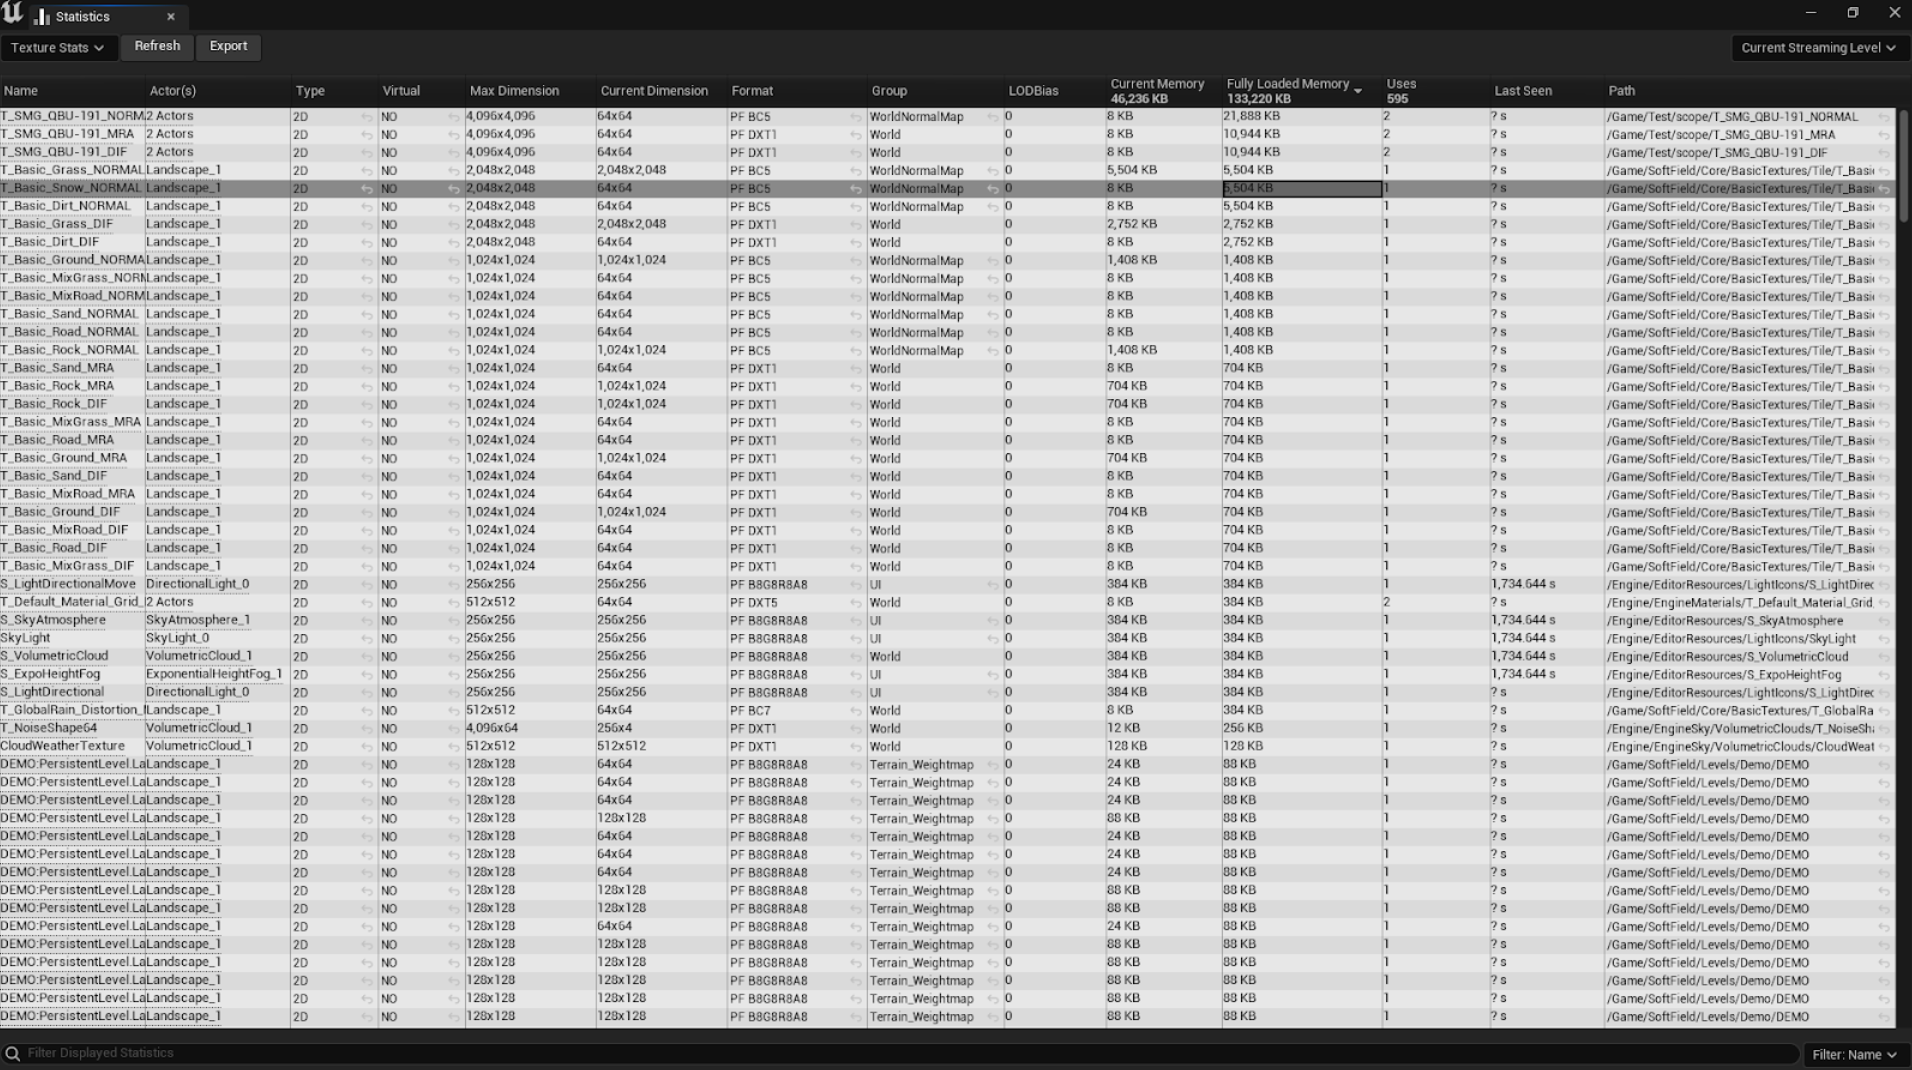
This tool allows you to monitor the amount of memory used for selected objects or all objects in the level. It is an essential tool for debugging and optimizing the level, but it is also useful for 3D modelers. You can easily select one or multiple objects whose information you want to see.
In the right part of the window, there is a filter that allows you to choose what information you want to focus on - selected objects or the entire level. As a 3D modeler, you will probably be interested in the specific object option - "Selected Objects."

In the left part of the table, you need to choose what specific information you want to know. As a modeler, you are mainly interested in two options - Primitive Stats and Textures Stats. The first one is statistics about the mesh, specifically the number of triangles and their size in KB. The second one shows information about textures - how many texture maps an object is using at the moment, how much it currently consumes, and how much it would consume under maximum load. All data is presented in KB.

Upside panel 2
Now let's look at the important elements below: "Selection Mode," "Quick Add," "Play," and "Stop."
"Play" and "Stop" are straightforward: the first button starts the game simulation, and the second one stops it (you can also stop the simulation using the "Esc" key).
However, "Selection Mode" and "Quick Add" require more detailed explanation.

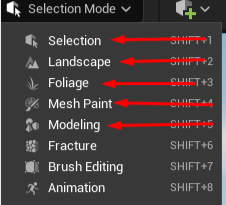
Selection Mode
Among all the listed options, we are actually interested in only the first five: "Selection," "Landscape," "Foliage," "Mesh Paint," and "Modeling."
- "Selection": This mode is for selecting objects in the scene. You can highlight objects, drag, scale, or delete them. It's the standard mode.
- "Landscape": This mode allows you to create and edit the landscape in your level. You can make mountains, hills, valleys, and other terrain shapes to give your game or scene a natural and realistic look.
- "Foliage": Here, you can add and edit vegetation in your level, such as trees, bushes, and grass. This helps create a more picturesque and atmospheric environment.
- "Mesh Paint": This tool allows you to paint on the mesh using vertices. It's commonly used for painting textures on models in the engine, but it's less used in version 5.2 due to compatibility with Nanite.
- "Modeling": This mode provides tools for creating and editing 3D models directly in the engine. You can make complex shapes and details for your objects or characters.
Quick Add
This is the icon of a cube with a plus sign, known as "Add Actor" or "Add Component." It provides a wide range of useful functions, including quick creation of primitive objects like cubes, spheres, and other shapes.
Additionally, through this icon, you can add various light sources, cameras, sound effects, and other components that enrich your level or scene. It also allows you to adjust post-processing components to achieve desired real-time visual effects.

Among the useful elements, the following tools will be particularly important for creating levels:
- Sky Light: Used to simulate various natural lighting, such as daylight or moonlight.
- Sky Atmosphere: Allows you to create realistic atmospheric effects, including a blue sky, clouds, and transitions between day and night.
- PostProcessVolume: Allows you to adjust post-processing effects on the scene, including color correction, toning, blur, and other visual effects.
- Exponential Height Fog: Creates an atmospheric fog effect that adds depth to your level.
- Volumetric Clouds: Provides tools for creating realistic volumetric clouds that add atmosphere to your scene.
- Directional Light: An important light source that simulates sunlight. It allows you to control the lighting in the scene and create dynamic shadows.

Upside panel - Settings
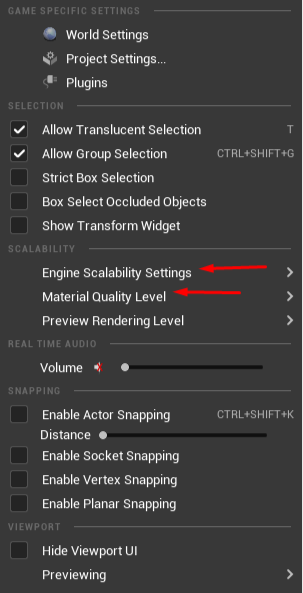
At the top of the screen, there is another very useful option - Settings.

When you choose this option, you'll see a small menu with various possibilities, but we are only interested in two of them - "Engine Scalability Settings" and "Material Quality Level."
In "Engine Scalability Settings," you can reduce the resolution of textures, shadows, and other graphic settings to make the work more comfortable if you have a less powerful PC.
The second option, "Material Quality Level," allows you to apply lower shader levels to materials.
Viewport
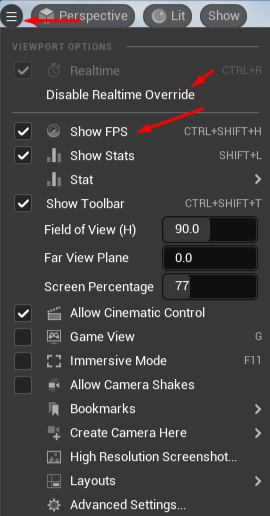
The viewport is not overloaded with various settings and icons; only its top part contains some elements. To avoid confusion, let's start exploring the interface from left to right.

By clicking on the first option, a window with additional information will pop up. Two useful functions you might need are:
- Show FPS: displays your Frames Per Second (the number of frames per second) on the right side of the screen.
- Disable Realtime Override: turns off all real-time special effects.
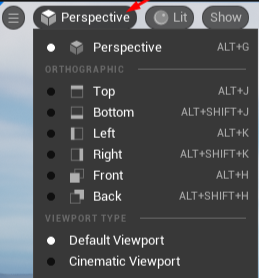
The next button allows you to choose the view in which you want to see the world. Sometimes it's useful to look at the level from above or from the side.
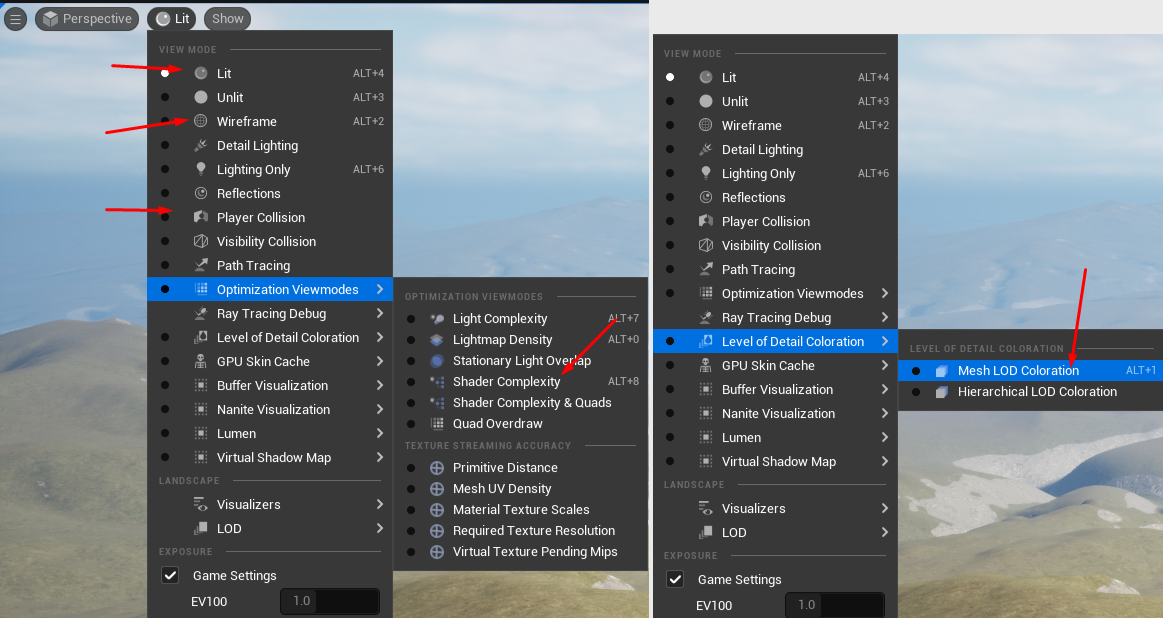
The next button is the most important of all; here you can change the display mode.
- Lit: shows objects with their shaders, including all shadows.
- Unlit: removes lighting and shadows, displaying objects without lighting effects.
- Wireframe: shows the wireframe of objects.
- Player Collision: displays the collision that restricts the movement of units in the game.
- Optimization Viewmodes => Shader Complexity: shows the complexity of objects' shaders.
- Level of Detail Coloration => Mesh LOD Coloration: shows how the Level of Detail (LOD) works for objects at the current moment.

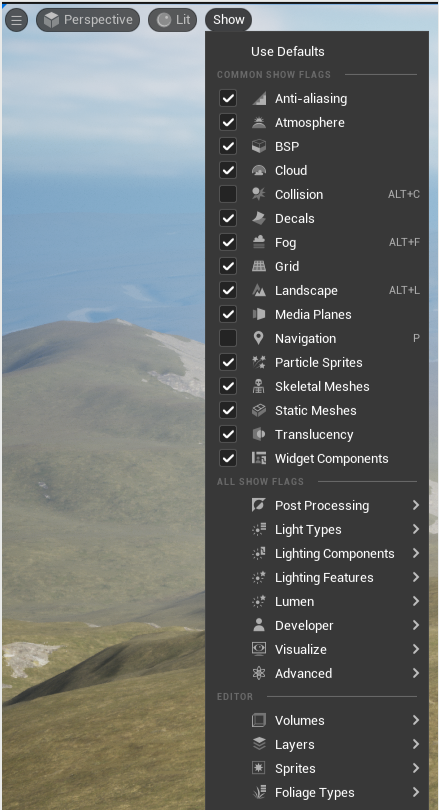
The next tab determines what to show and what not to show in the scene. You don't need to change anything here as all settings are already set to default.
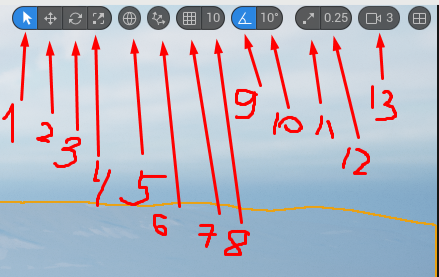
On the right side, there is a bit more functionality.
- Object Selection: In this mode, you won't accidentally move the object.
- Object Translation along the XYZ axes.
- Object Rotation.
- Object Scaling.
- Interaction with objects either using global or local parameters (Pivot will move either locally or globally).
- Determines how objects will snap together.
- Enable/disable movement step mode.
- Movement step value (in cm).
- Enable/disable rotation step mode.
- Rotation step value (in degrees).
- Enable/disable scaling step mode.
- Scaling step value.
- Camera movement speed.
Camera Control
- To move around in the space, you need to hold the right mouse button and use the keys WASD. You can also use Q to move up and E to move down.
- While moving, you can rotate the mouse wheel to speed up or slow down the camera movement.
- Holding CTRL+SHIFT allows you to select objects with the left mouse button.
- Holding ALT allows you to copy an object.
- Holding SHIFT allows you to move the object along with the camera.
- When you select an object and hold CTRL, you can rotate, scale, or move it using the right, left, or both mouse buttons.
- Pressing F while selecting an object will center the camera on the selected object (move to it).
- Pressing CTRL+SPACE opens the Content Drawer.
- Holding the right mouse button and pressing C zooms in, and pressing Z zooms out. To return to the original zoom level, release the right mouse button.
- R.CTRL+L Move the sun in scene
Right Menu
In the right part of the screen, there are tabs: Details, Outliner, and others. You are interested in the first two.
Details
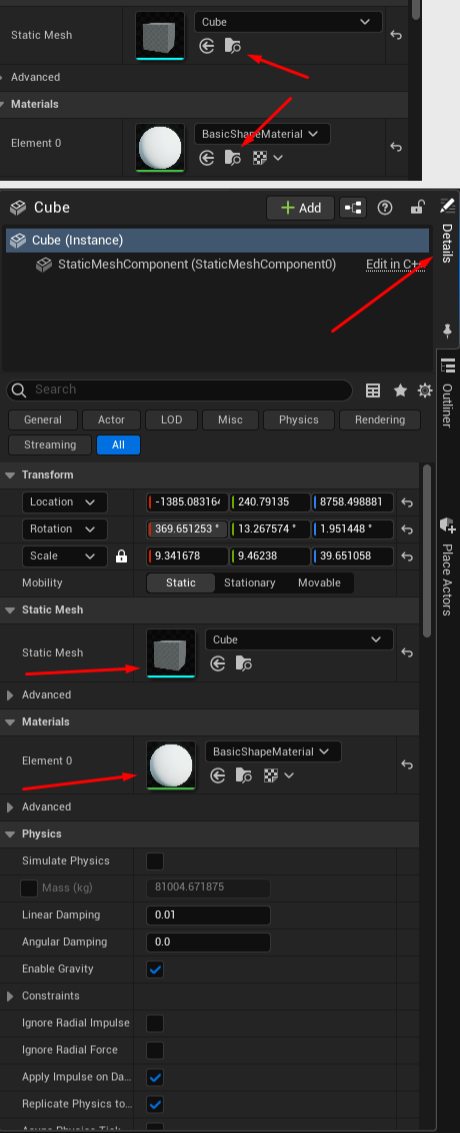
Details - displays information about the selected object along with all its settings. You can quickly access the mesh by clicking on "Static Mesh." If you need to go into the materials of the selected object, you can do it by clicking on "Materials."
To navigate to the location of these files in the explorer, click on the folder with a magnifying glass next to them.
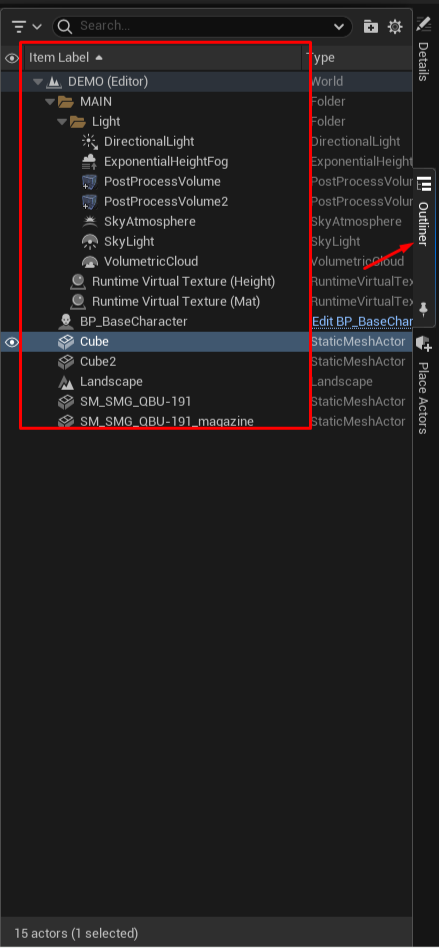
Outliner
Outliner - in this menu, you can see all the objects located on the level.
Content Drawer
At the bottom of the screen, you will find the Content Drawer tab, which you will be using most of the time. You can open it either by clicking on its name or by using the hotkey CTRL+SPACE.
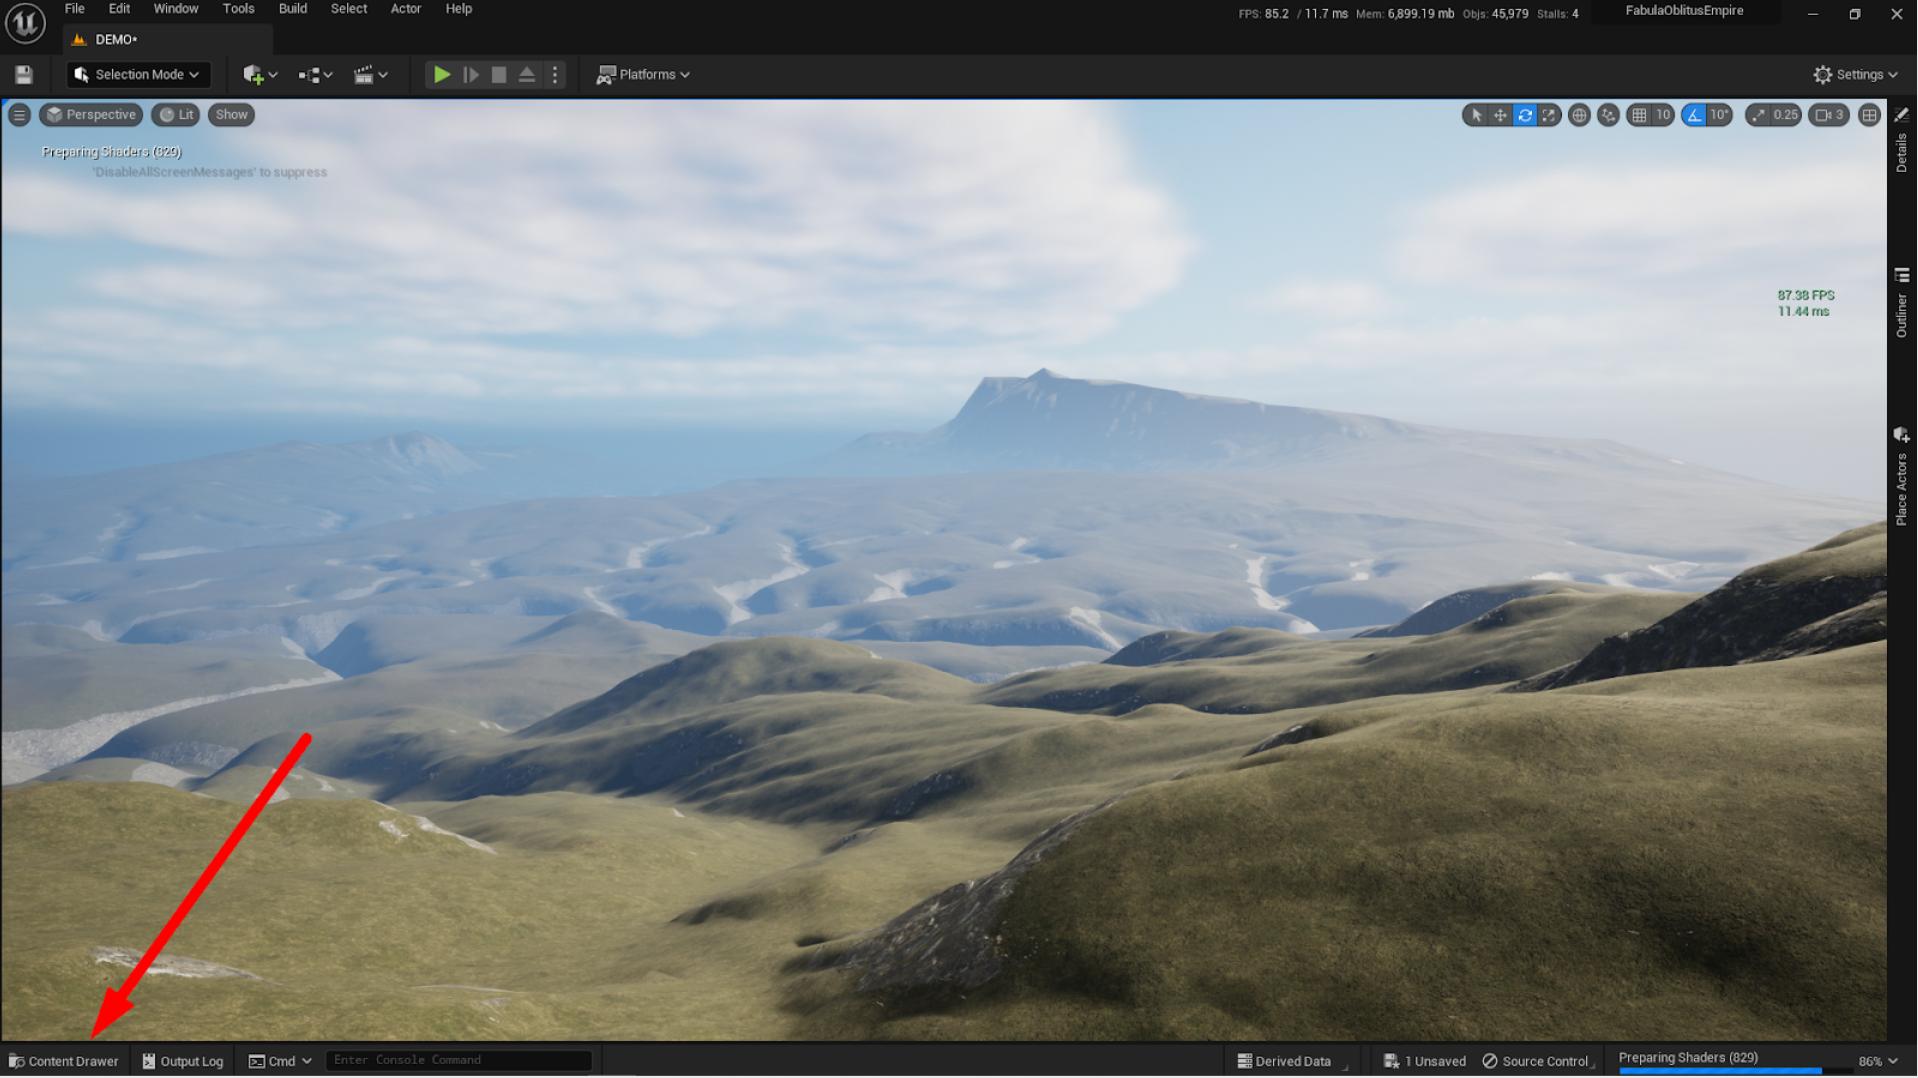
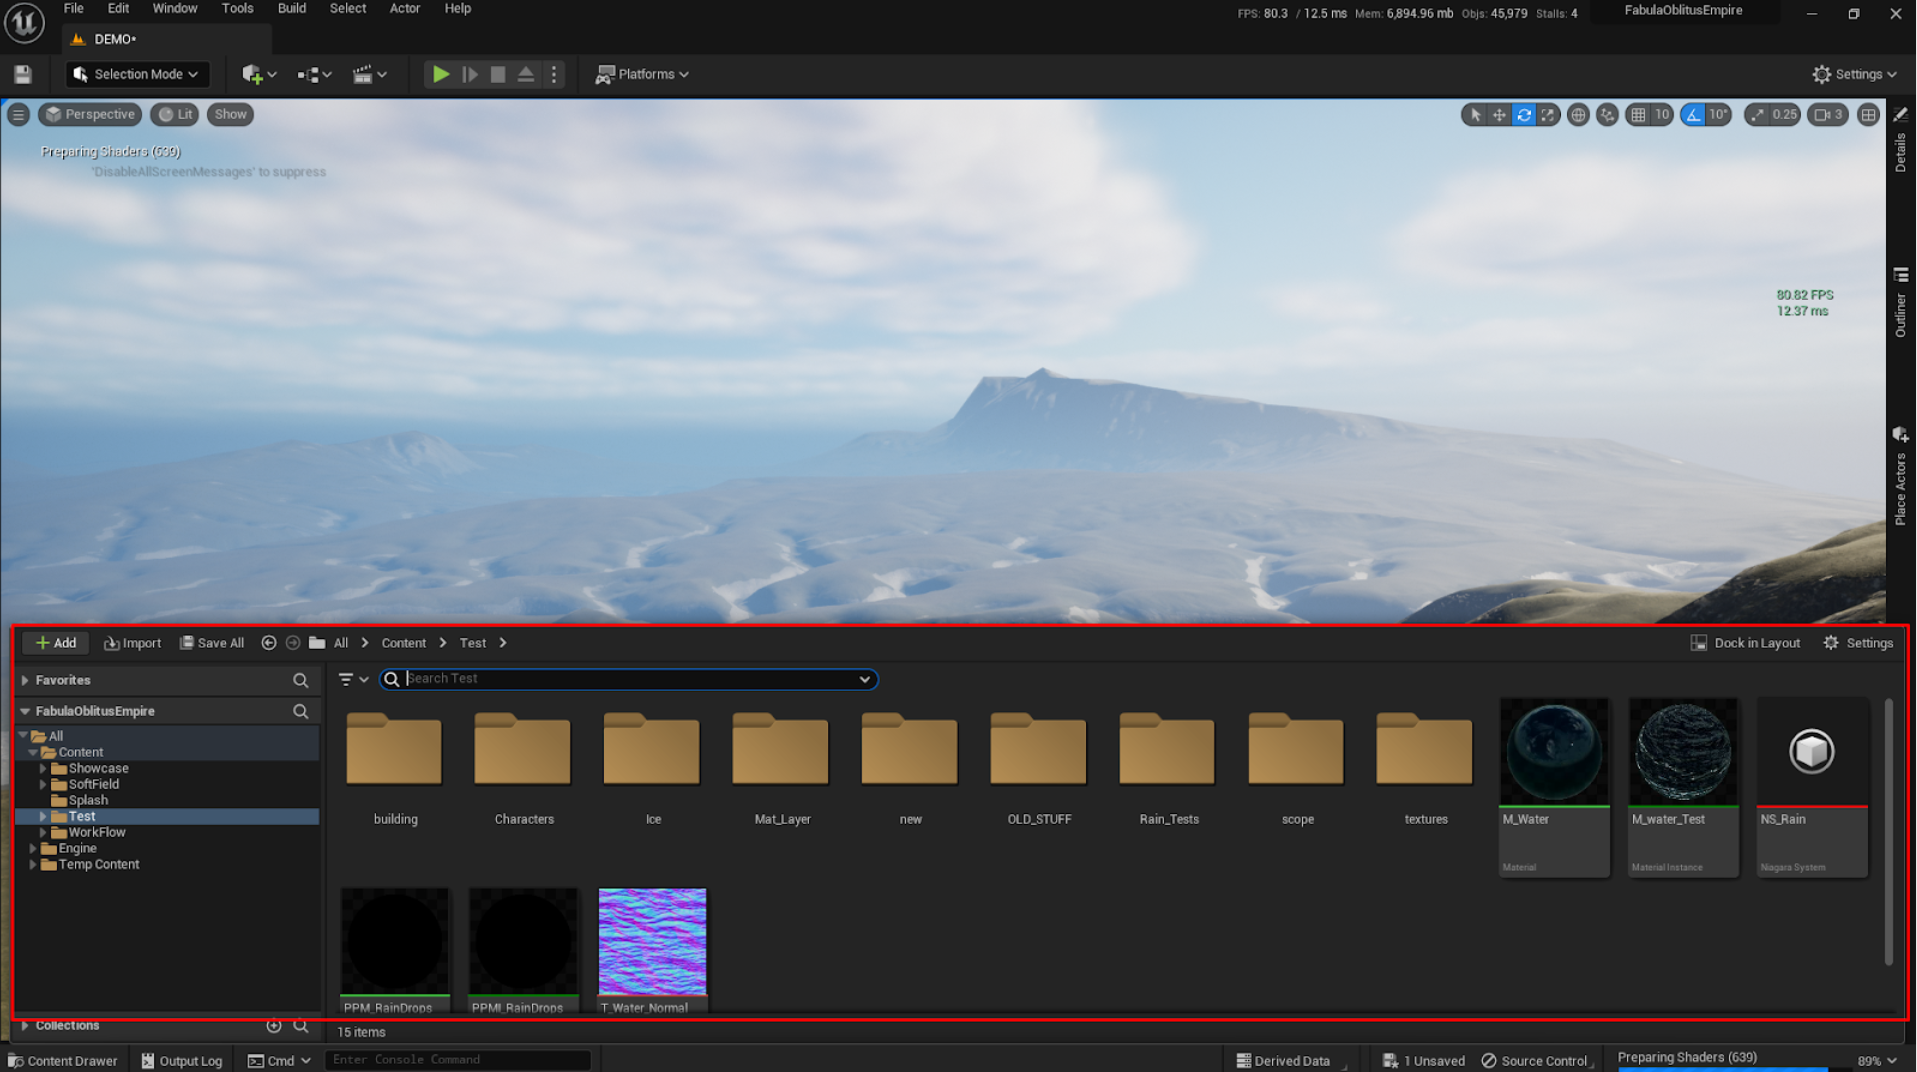
If you want the window not to close, you can undock it by clicking on the "Dock in Layout" option.

Also, you can click on "Settings" in the Content Drawer menu to access additional features.
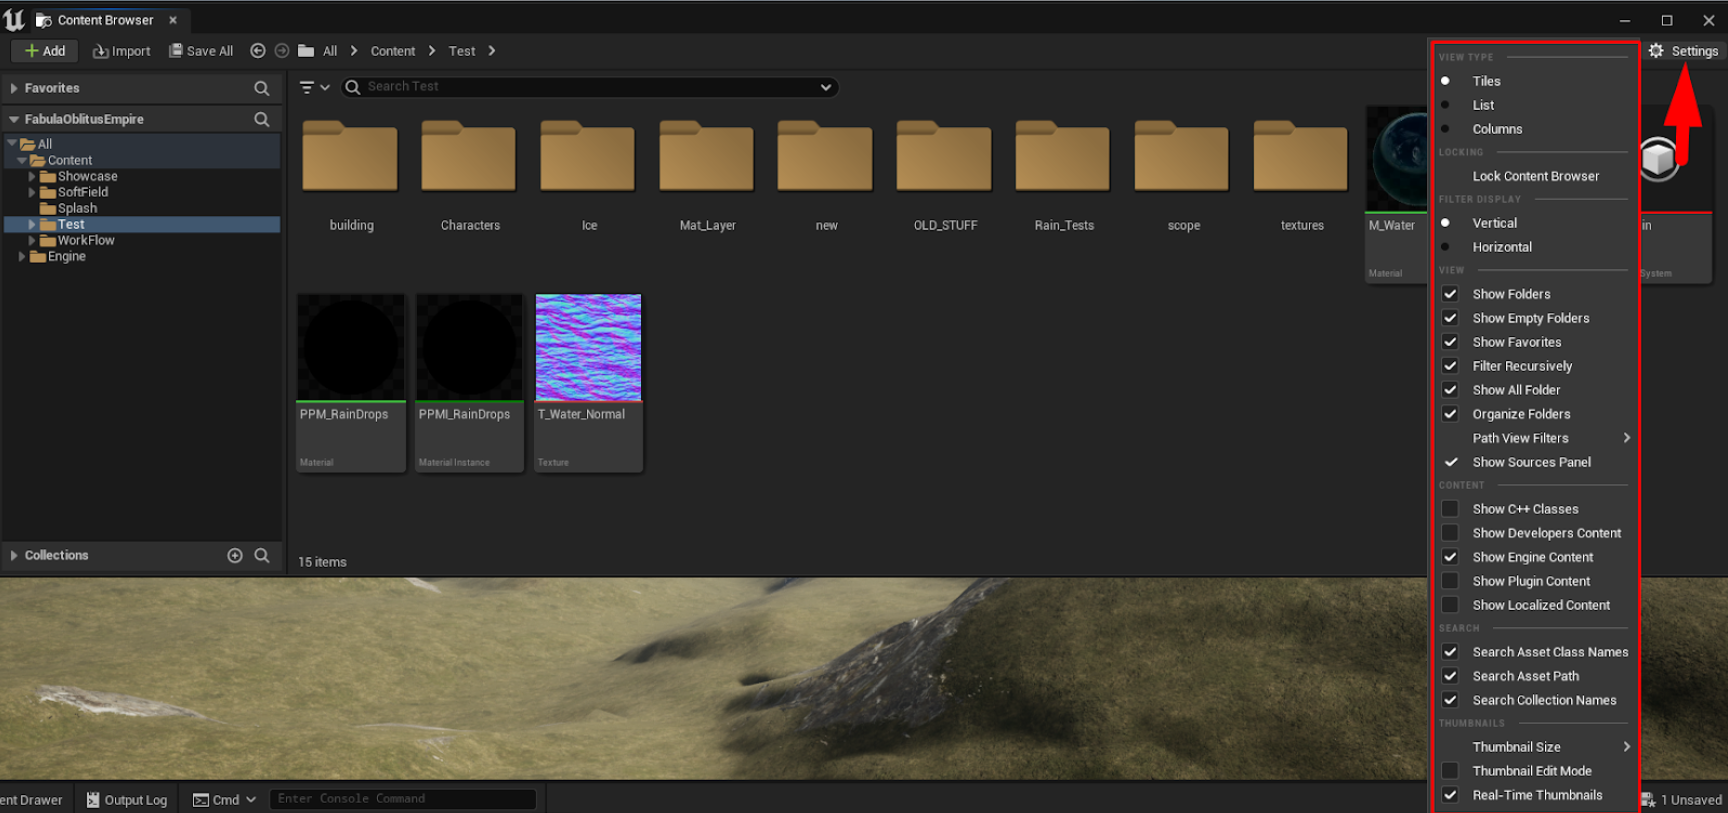
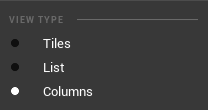
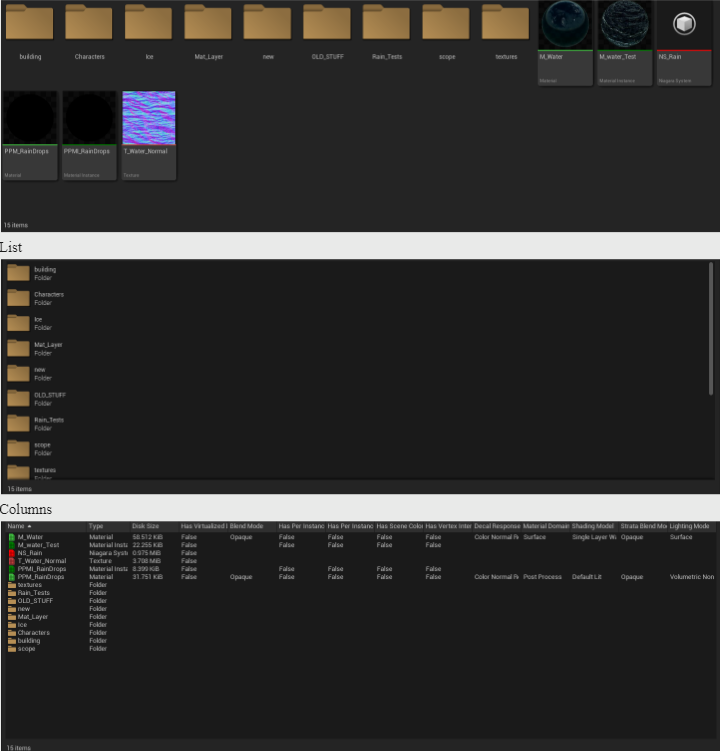
You can change how the files are displayed: Tiles, List, or Columns.
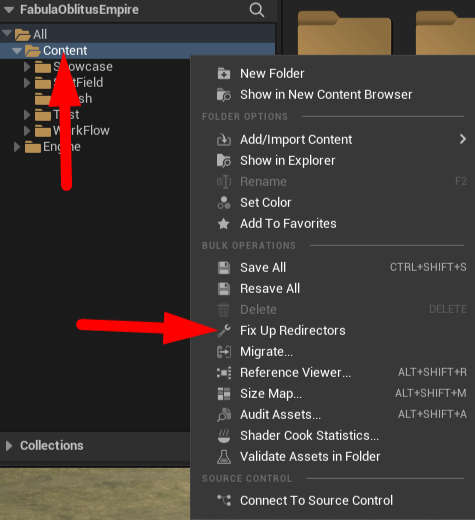
Sometimes, when you move already saved or used files from one folder to another, you need to redirect the paths. To do this, right-click on the Content folder and select "Fix up Redirection."
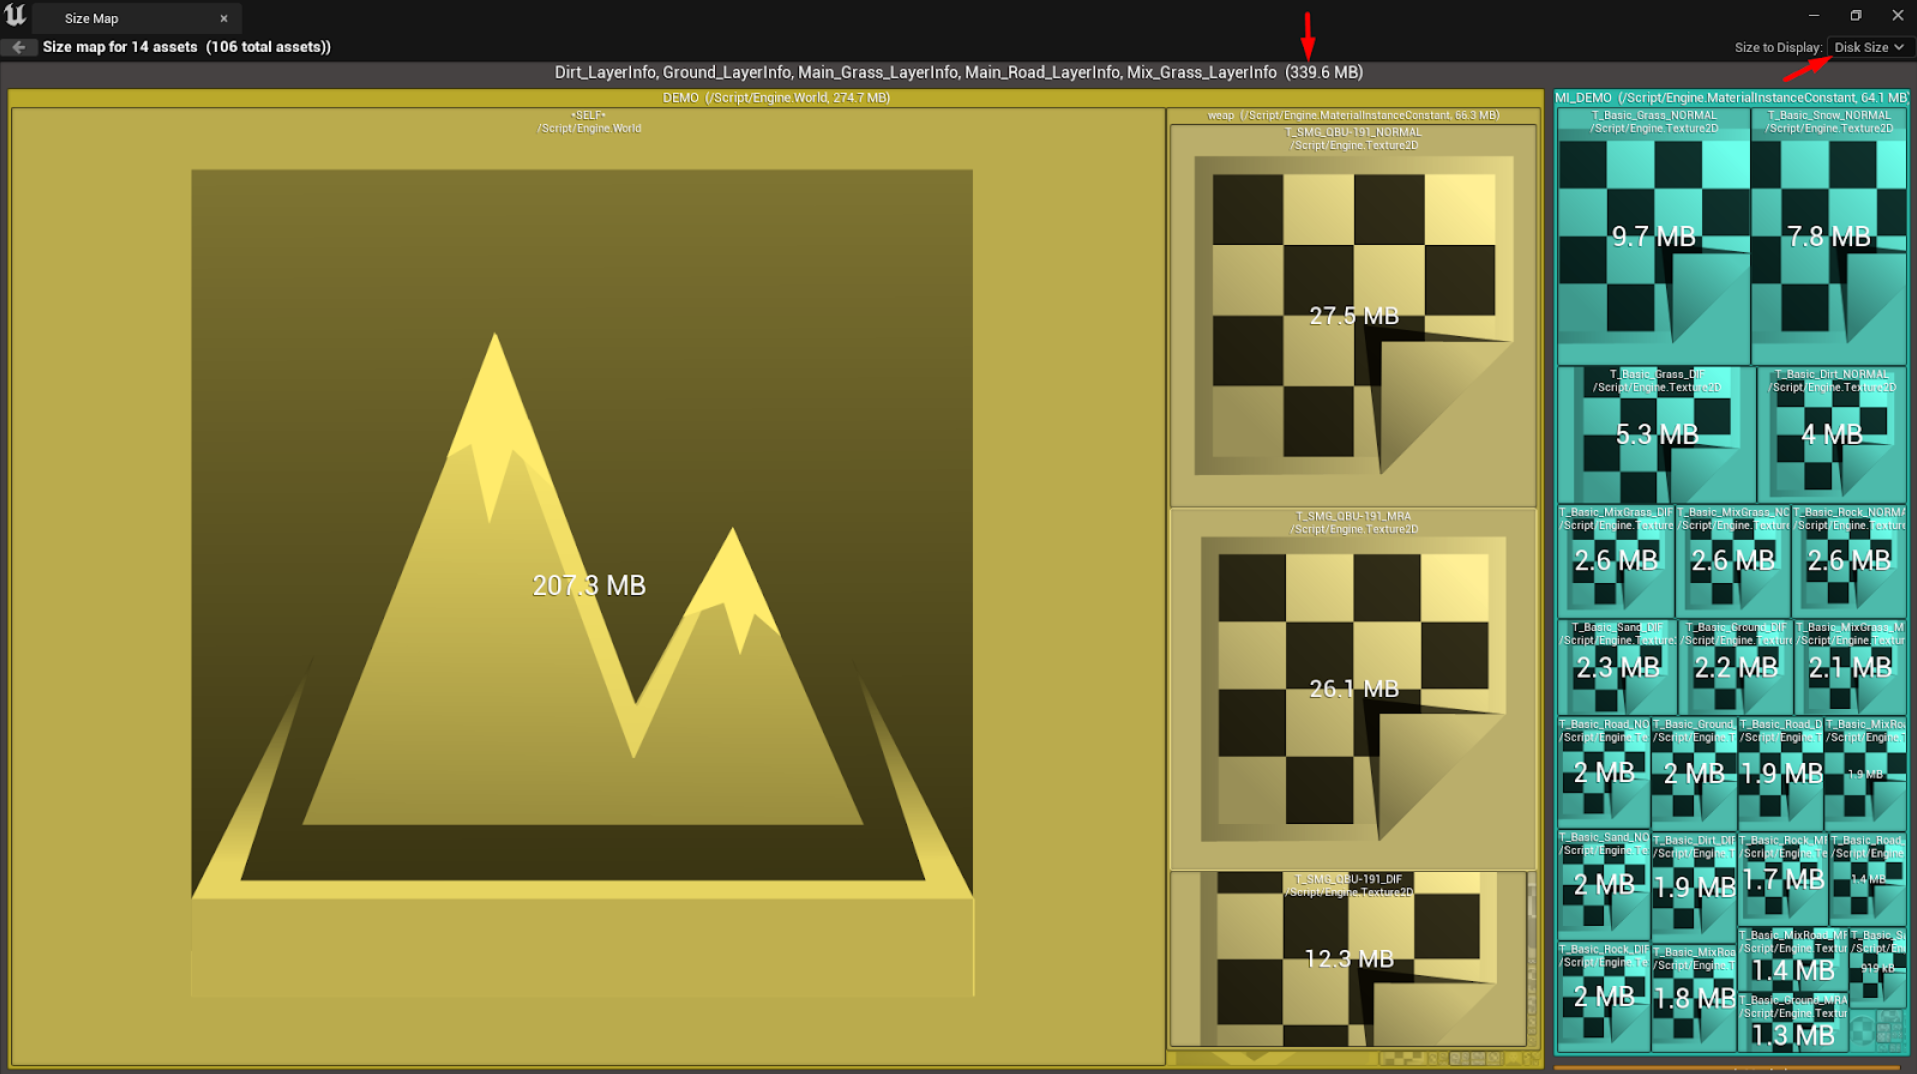
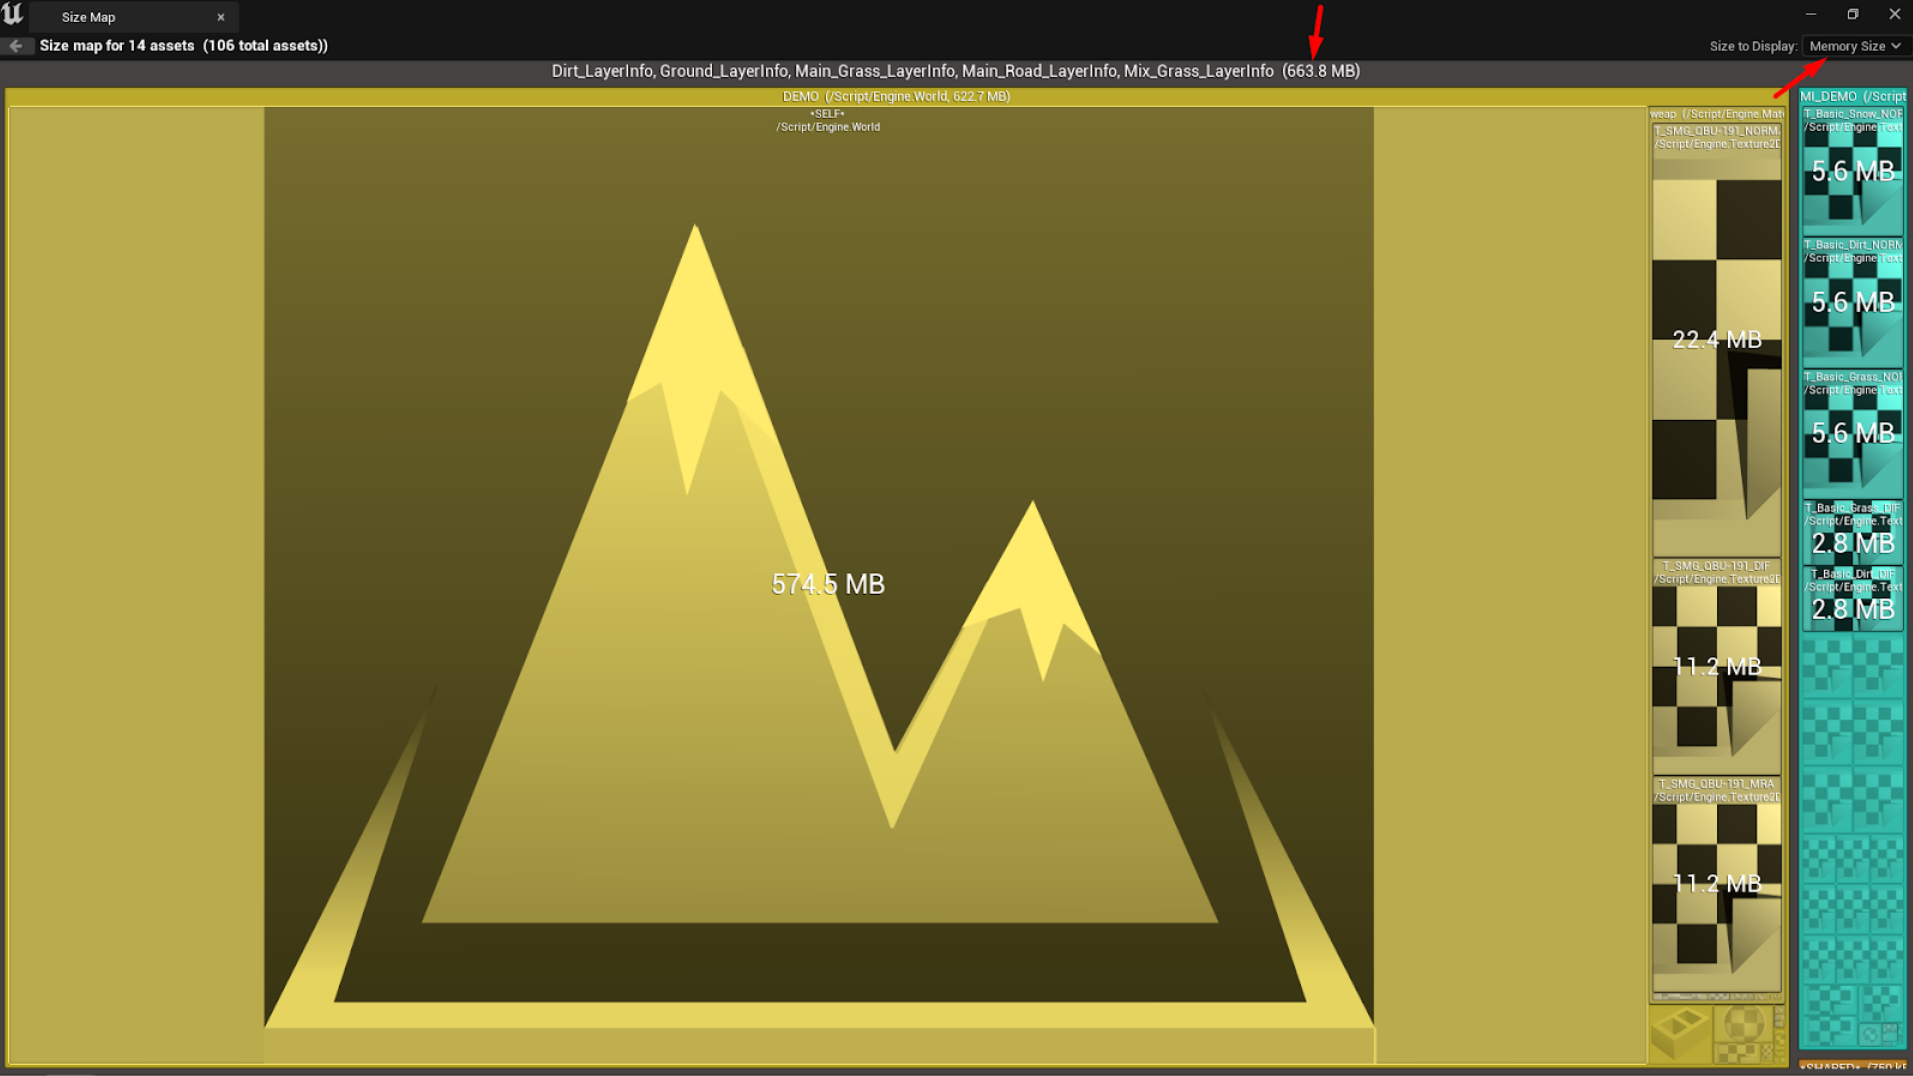
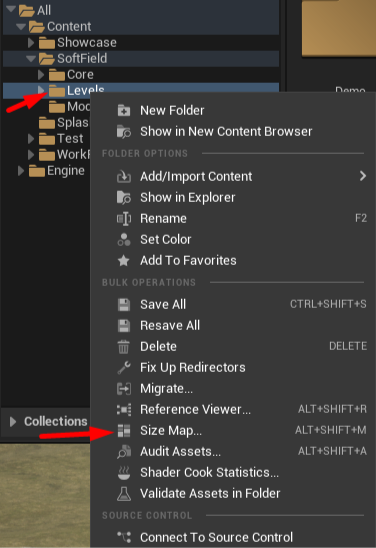
You can also check how much space the files occupy in the selected folder. To do this, select the folder you want and right-click on it, then choose "Size Map."
After doing this operation, a new window will open with information about how much space the selected folder and all the files that use files from this folder occupy. For example, the folder may contain an instance material that uses a master material from another folder, which, in turn, uses textures from a third folder. This option will gather all the files used in this folder, even if some of them use information from other folders.
On the right side of this window, you can see filters: "Disk Size" and "Memory Size." "Disk Size" shows how much space these files take on your HDD/SSD, and "Memory Size" shows the amount of used RAM (Random Access Memory).
